Pumpkin Carving in Relief
Rather than cutting holes all the way through a pumpkin's skin, some people remove layers of the skin to create designs. You can do this one of two ways. You can scrape your design into the surface of the pumpkin so that the light shines directly through it. Or, you can scrape away all of the skin in a circle around your design so that the silhouette creates the image. You can create a design yourself, or you can find patterns in books or on Web sites.
To carve a design in relief, first clean your pumpkin and cut out a lid. Remove the pulp from the pumpkin and scrape the inside. Then, draw your design on your pumpkin using avgrease pencil or dry-erase marker. You may also want to cut along your design using a utility or craft knife. The cut will help you guide the tool you use to remove the pumpkin's skin.
Advertisement

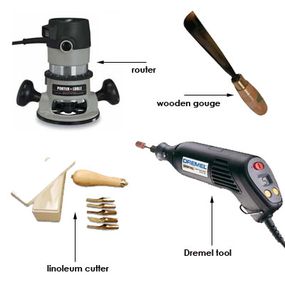
Then, you'll remove the skin from the design or from the area around it. The deeper you make the pattern, the brighter the design will be when you light the pumpkin. You can use several tools to do this, including:
- A wood gouge
- A linoleum cutter
- A Dremel tool or similar handheld device
- A router
If you're using a wood gouge or a linoleum cutter, make sure it's clean and sharp. Using dull tools is dangerous because it takes far more force to cut into the pumpkin skin. If you use a Dremel tool or router, be careful. Both are power tools, and they can send pieces of pumpkin flying at high speeds. Using power tools to carve a pumpkin can also be significantly messier than using a gouge or other cutter. If you decide to use power tools to carve your pumpkin, it's a good idea to:
- Practice on a test pumpkin to get a feel for how the tools cut into its surface.
- Wear safety glasses and old clothes.
- Carve the pumpkin outside.
- Make sure children and pets stay back from the work area.
