How to Carve a Pumpkin

By: Tracy V. Wilson  | 
man's arm carving pumpkin
Carving a pumpkin doesn't have to be hard. ©iStock/Thinkstock

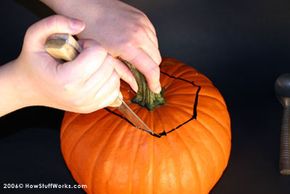
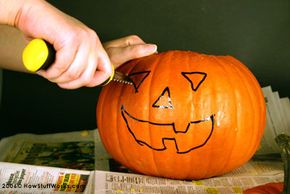
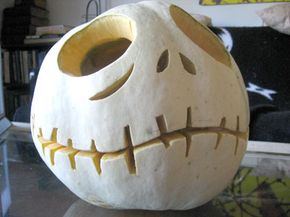
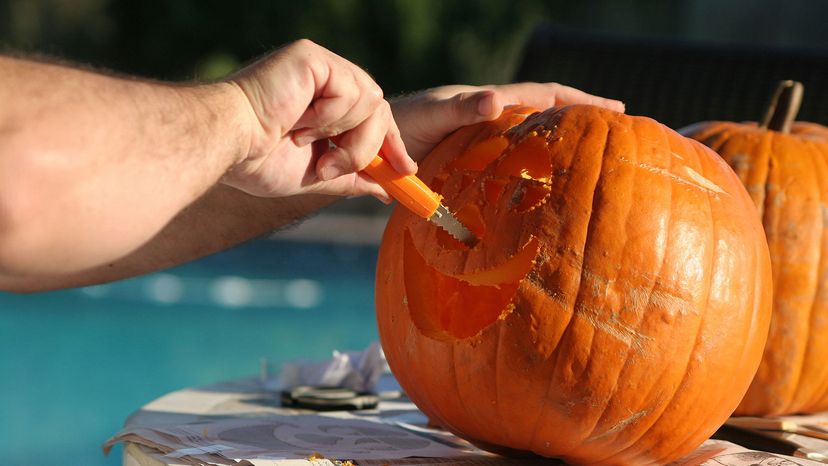
Carving a pumpkin is really pretty easy. With a few short, straight cuts with a knife, you can make triangular eyes, ­a nose and a toothy mouth. The result is a face almost anyone can recognize, even if you just draw it on a piece of paper. It's the face of a Jack O Lantern.

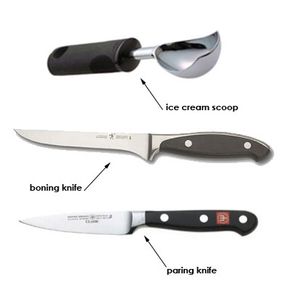
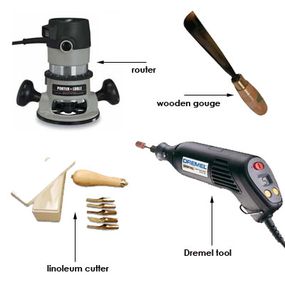
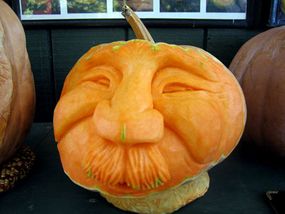
But carving a really memorable jack-o'-lantern can take a little more planning. Sometimes, you can do it with the same knives you'd use to carve a basic face. Other designs, though, require extra tools and extra time. This guide will give you a good idea of how to carve jack-o'-lanterns in a variety of sizes and styles using a range of techniques.

Advertisement

Whether you want to create snaggletooth grins or elaborate scenes, the first step in carving a good jack-o'-lantern is selecting a good pumpkin. The shape of the pumpkin should match the shape of the design you have in mind. Or, you can pick your pumpkin first and decide on a design that will suit it later. You can also try carving a white pumpkin, a butternut squash or a gourd in place of a traditional orange pumpkin.

Your pumpkin should sit on a flat surface without rolling over. Its skin should be free from cuts or abrasions, and its stem should be about 2 inches (5 centimeters) long. Before purchasing a pumpkin, tug the stem firmly and press the area around it with your finger. If the pumpkin is soft or if the stem pulls free, it has started to rot, and you should choose another one. Once you get your pumpkin home, use a damp cloth to remove any dirt from the surface, and pat the pumpkin dry.

Pumpkin Carving Tools

The basic pumpkin carving tools
Image courtesy Amazon.com

Whether you're carving a simple or complex jack-o'-lantern, your first step is to gather all of your materials. You can buy a pumpkin carving kit that contains everything you need, but you probably already have most of the necessary tools in your kitchen. For a basic jack-o'-lantern, you'll need:

  • A large boning knife
  • A small paring knife
  • A large spoon or ice cream scoop
  • A bowl
  • A dry-erase marker or grease pencil
  • Newspaper
  • An apron
  • A damp cloth or paper towel

You can use a keyhole saw instead of a paring knife to cut out the details in your pumpkin. A keyhole saw is sharp and maneuverable and by using a sawing motion, you can cut with it quickly and accurately. You can buy keyhole saws at craft supply stores and hardware stores. They're often included in pumpkin carving kits as well.

Advertisement

Put these tools to use on the next page -- start carving!­­

Pumpkin Carving Instructions: Cutting the Lid

Carve the lid out at an angle to keep it from falling in.

Before you start carving, cover your working surface with newspaper and put on your apron. Then:

1. Use the pencil or marker to draw a circle around the pumpkin's stem. This will be the jack-o'-lantern's lid. The circle should be about two-thirds the diameter of the pumpkin. It's a good idea to include a small notch in the circle to help you align the lid correctly when you replace it. You can also use another shape for your lid, like a star or a hexagon. Some people prefer to cut a lid from the bottom rather than the top, since this can make it easier to replace and light candles.

Advertisement

2. Cut along the line using the boning knife. Point the knife inward (toward the center of the pumpkin) at about a 45-degree angle. This will keep the lid from falling down into the pumpkin.

3. Remove the lid from the pumpkin and cut or scrape away any pulp that is hanging from it.

Pumpkin Carving Instructions: Cleaning the Pumpkin

4. Remove the pulp from the pumpkin using a spoon or your hands. Place the pulp in the bowl if you plan to roast the pumpkin seeds later. Otherwise, throw the pulp away.

5. Scrape the inside of the pumpkin clean with the spoon or ice cream scoop. The more of the pumpkin you scrape away, the more light will shine through the surface. Make sure you scrape the bottom until it is flat so your light source won't fall over inside the pumpkin.

Advertisement

Pumpkin Carving Instructions: Carving Designs

6. Sketch the jack-o'-lantern's face on the surface of the pumpkin. If you make a mistake, use a damp cloth to wipe it away -- marks from dry-erase markers or grease pencils should come off easily.

7. Use a paring knife to cut along each line. Use your finger to push the cut-out pieces out of the pumpkin.

Advertisement

Using these steps and a little creativity, you can make a unique pumpkin easily. Here are some ideas ­for customizing your pumpkin:

­

  • Instead of cutting a lid, cut off the entire top of your pumpkin in a zigzag line that resembles spiky hair.
  • Hold your knife at a slight inward angle as you cut out your design rather than cutting straight through the pumpkin. This will leave a thin rim of visible pumpkin flesh around each hole. When you light your jack-o'-lantern, this will create an orange glow around your design. You can use different cutting angles to create patterns of light and shadow on your pumpkin's surface.
  • Use leftover pieces of pumpkin to make ears, eyes or a nose. Attach these pieces using toothpicks.
  • Rather than cutting a face into your pumpkin, cut another design, like a cat, a bat or a message to trick-or-treaters.

You can also make memorable pumpkins by using stencils or carving your design as a relief instead of a cut-out. We'll look at these and other techniques in the next section.

Advanced Pumpkin Carving

Use a sharp tool to transfer the stencil to the pumpkin's surface.

You can make a wide variety of jack-o'-lanterns using basic pumpkin-carving techniques and simple sketches. But if you aren't skilled in drawing or want a really elaborate jack-o'-lantern, you may want to try using a stencil.

You can find stencils online or purchase books that include a selection of stencils. It's a good idea to select your stencil before you buy your pumpkin -- you want to make sure your stencil will fit on the pumpkin you choose. Take your stencil with you when you go shopping.

Advertisement

When carving from a stencil, you'll need all the tools used for basic pumpkin carving. In addition, you'll need an artist's stylus, an ice pick or an awl. These are all long, narrow, pointed tools that can make small holes in the surface of the pumpkin. You'll use these holes to transfer the design from the stencil to the pumpkin.

An ice pick
Image courtesy Amazon.com

Prepare your stencil before you start carving the pumpkin. Cut the excess paper from the edge of the stencil, leaving enough room to tape the stencil to the pumpkin. Study your stencil carefully and figure out which parts of the pumpkin will be removed in the cutting process. You may want to cut out the corresponding parts of the stencil if you find the lines too confusing.

­

Once you're comfortable with your stencil, prepare your pumpkin. Clean the surface, cut out the lid, remove the pulp and crape the inside clean. Then, tape your stencil to the pumpkin. Make sure it follows the pumpkin's curves as much as possible. You may need to cut your stencil into smaller pieces that will match the contours of your pumpkin.

Once your stencil is securely in place, use your stylus to punch small holes into the skin of the pumpkin. Follow the lines of the stencil carefully, and make your holes fairly close together. Don't try to punch your stylus all the way through the pumpkin -- just make holes in the skin that you can use as a guide. Once you've made small holes along each line in the stencil, remove it and keep it nearby for your reference.

You may find it helpful to use a utility or craft knife to connect the dots before you start carving to create a guide for your knife. Use a paring knife or a keyhole saw to connect the dots that you made with the stylus, referring to your printed stencil as needed. Cut out large pieces first, and fill in the details later. If necessary, go back around your design and clean up the edges.

Pumpkin Carving in Relief

On this jack-o'-lantern, SpongeBob Squarepants' body is carved in relief.
Image courtesy Robert Gusick

Rather than cutting holes all the way through a pumpkin's skin, some people remove layers of the skin to create designs. You can do this one of two ways. You can scrape your design into the surface of the pumpkin so that the light shines directly through it. Or, you can scrape away all of the skin in a circle around your design so that the silhouette creates the image. You can create a design yourself, or you can find patterns in books or on Web sites.

To carve a design in relief, first clean your pumpkin and cut out a lid. Remove the pulp from the pumpkin and scrape the inside. Then, draw your design on your pumpkin using avgrease pencil or dry-erase marker. You may also want to cut along your design using a utility or craft knife. The cut will help you guide the tool you use to remove the pumpkin's skin.

Advertisement

­

A selection of pumpkin carving tools
Images courtesy Amazon

Then, you'll remove the skin from the design or from the area around it. The deeper you make the pattern, the brighter the design will be when you light the pumpkin. You can use several tools to do this, including:

  • A wood gouge
  • A linoleum cutter
  • A Dremel tool or similar handheld device
  • A router­

If you're using a wood gouge or a linoleum cutter, make sure it's clean and sharp. Using dull tools is dangerous because it takes far more force to cut into the pumpkin skin. If you use a Dremel tool or router, be careful. Both are power tools, and they can send pieces of pumpkin flying at high speeds. Using power tools to carve a pumpkin can also be significantly messier than using a gouge or other cutter. If you decide to use power tools to carve your pumpkin, it's a good idea to:

­

  • Practice on a test pumpkin to get a feel for how the tools cut into its surface.
  • Wear safety glasses and old clothes.
  • Carve the pumpkin outside.
  • Make sure children and pets stay back from the work area.

Preserving and Displaying Your Pumpkin

Learn a few easy tips and you can keep your jack-o'-lanterns lit for the whole season.
Image courtesy Wil Wheaton. Pumpkins carved by Wil and Nolan.

After you finish your jack-o'-lantern, apply a thin layer of petroleum jelly to all of the cut surfaces and any area from which you've removed the skin. This will help preserve the jack-o'-lantern by keeping it from drying out. If your jack-o'-lantern starts to dry out, you can soak it facedown in cold water for a couple of hours to help it last a little longer. You can also extend the life of your pumpkin by refrigerating it during the day.

Many people use candles to light their pumpkins. Short, squat candles like tea lights or votive candles work well because they're less likely to tip over. If you'd prefer not to use candles, you can use glow sticks, electric holiday lights or battery-operated lights made specifically for jack-o'-lanterns.

Advertisement

Check out some of our favorite jack-o'-lanterns in the next section.

Jack-o'-Lantern Image Gallery

This Jack the Pumpkin King jack-o'-lantern uses a white pumpkin.
Image courtesy S. Corey Adams

The most impressive jack-o'-lanterns can be very simple designs or elaborate, intricate patterns. Here are some of our favorites.

A Napoleon Dynamite pumpkin.
Image courtesy Leila Jackson
A werewolf
Image courtesy Karen Lykke
A "murdered" pumpkin
Image courtesy S. Corey Adams
A scary clown
Image courtesy Robert Gusick
An image of Mad-eye Moody from the "Harry Potter" series
Image courtesy Robert Gusick
A three-dimensional face carved into a pumpkin at the North Carolina State Fair.
Image courtesy Katherine Neer

Advertisement

Lots More Information

Related Articles

More Great Links

  • eHow: How to Carve a Fancy Pumpkin with a Dremel http://www.ehow.com/how_8102_carve-pumpkin.html
  • eHow: How to Carve a Pumpkin http://www.ehow.com/how_3983_carve-pumpkin.html
  • Martha Stewart Living: Essential Pumpkin Carving Tools http://www.marthastewart.com/page.jhtml?type=content&id=channel160006&site=
  • Pumpkinmasters.com http://www.pumpkinmasters.com/ ­