Advanced Pumpkin Carving
You can make a wide variety of jack-o'-lanterns using basic pumpkin-carving techniques and simple sketches. But if you aren't skilled in drawing or want a really elaborate jack-o'-lantern, you may want to try using a stencil.
You can find stencils online or purchase books that include a selection of stencils. It's a good idea to select your stencil before you buy your pumpkin -- you want to make sure your stencil will fit on the pumpkin you choose. Take your stencil with you when you go shopping.
Advertisement
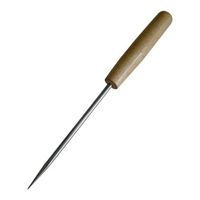
When carving from a stencil, you'll need all the tools used for basic pumpkin carving. In addition, you'll need an artist's stylus, an ice pick or an awl. These are all long, narrow, pointed tools that can make small holes in the surface of the pumpkin. You'll use these holes to transfer the design from the stencil to the pumpkin.
Prepare your stencil before you start carving the pumpkin. Cut the excess paper from the edge of the stencil, leaving enough room to tape the stencil to the pumpkin. Study your stencil carefully and figure out which parts of the pumpkin will be removed in the cutting process. You may want to cut out the corresponding parts of the stencil if you find the lines too confusing.
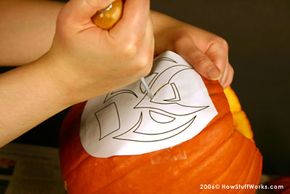
Once you're comfortable with your stencil, prepare your pumpkin. Clean the surface, cut out the lid, remove the pulp and crape the inside clean. Then, tape your stencil to the pumpkin. Make sure it follows the pumpkin's curves as much as possible. You may need to cut your stencil into smaller pieces that will match the contours of your pumpkin.
Once your stencil is securely in place, use your stylus to punch small holes into the skin of the pumpkin. Follow the lines of the stencil carefully, and make your holes fairly close together. Don't try to punch your stylus all the way through the pumpkin -- just make holes in the skin that you can use as a guide. Once you've made small holes along each line in the stencil, remove it and keep it nearby for your reference.
You may find it helpful to use a utility or craft knife to connect the dots before you start carving to create a guide for your knife. Use a paring knife or a keyhole saw to connect the dots that you made with the stylus, referring to your printed stencil as needed. Cut out large pieces first, and fill in the details later. If necessary, go back around your design and clean up the edges.