Kids Halloween Costumes

kids Halloween costumes
With these easy instructions, create budget-conscious, no-sew kids' Halloween costumes for boys, girls, and even the family dog! Zing Images/Getty Images

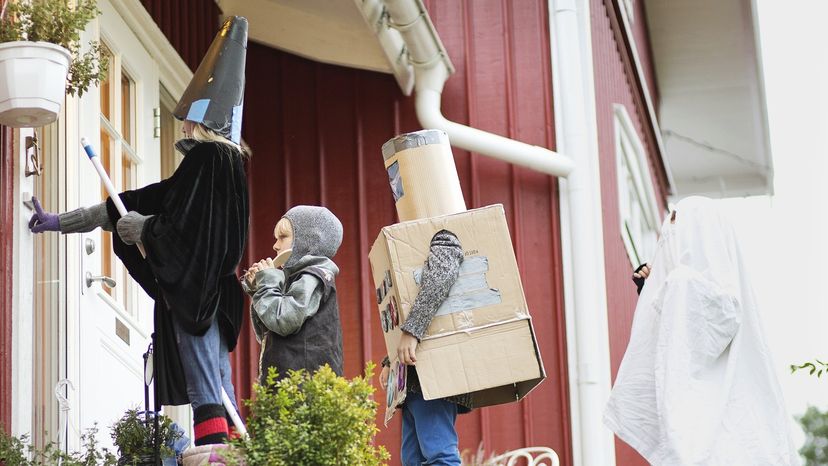
If you've run out of Halloween costume ideas for kids, don't turn to a costume shop for pricey premade garb. Instead, get inspired with the inexpensive and original ideas that follow. Don't sew? Don't worry. With just a few dabs of glue and the slide of an iron, you can make your child tops on the trick-or-treat block or the hit of the Halloween party with these no-sew kids' Halloween costume masterpieces.

Halloween Candy Image Gallery

Advertisement

Still not convinced? Check out the array of kids' Halloween costume options -- from spooky to space age to just plain silly -- we've compiled for you here.

Pretty as a Princess Costume

Transform a little girl into her favorite fairy tale princess with some felt and faux jewels.

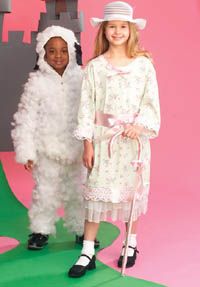
Bo Peep and Her Sheep Costumes

Shepherd your kids into these easy-to-assemble ensembles and send them to trick-or-treat as a herd.  kids-halloween-costumes3.htm

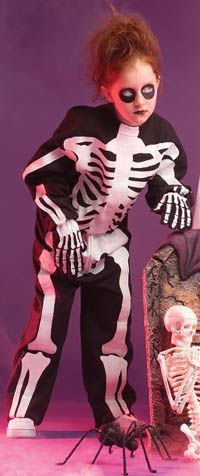
Bag of Bones Costume

Nothing says Halloween like a spooky skeleton, and nothing says simple to make like this sweat suit-based costume.

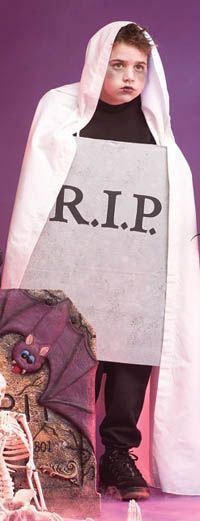
Graveyard Ghost Costume

If bones don't qualify as ghoulish garb, what about no body at all? A white sheet, some cardboard, and paints can make any kid a ghostly presence.

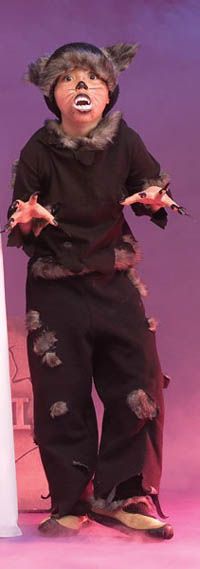
Werewolf Costume

Bring out your kid's inner animal with this costume, which is faux-furry, ferocious, and fun.

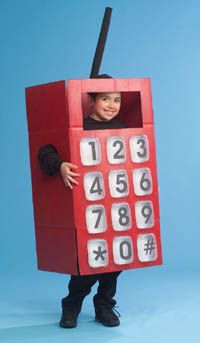
Cell Phone Costume

Your kid can be a cultural phenomenon -- and handy communication device -- in this easy cardboard-box costume.

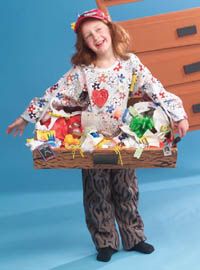
Messy Drawer Costume

A few household odds and ends, a cake box, and a flair for the disorganized are the keys to this getup guaranteed to garner laughs.

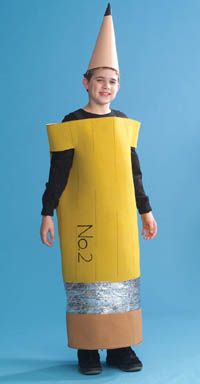
Pencil Costume

You'll have the sharpest of trick-or-treaters when you outfit your young scholar in this oversized pencil suit.

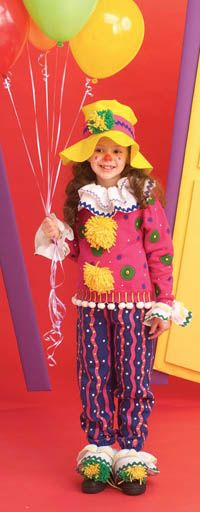
Clown Costume

Everyone loves a clown -- especially you when you see how easy it can be to create a floppy, festive costume.

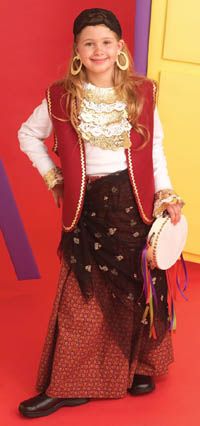
Gypsy Costume

Twirling with her tambourine, your kid will love the gypsy life. Or you can catch the pirate craze with just a few tweaks to this no-sew costume.

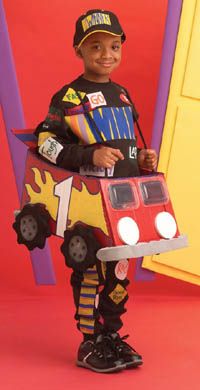
Race Car Driver Costume

Send your kid to trick-or-treat in style -- and at record speed -- in a custom-built costume that includes a car!

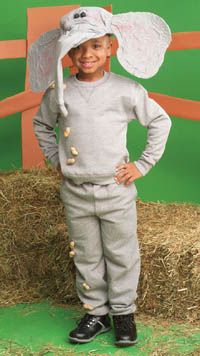
Elephant Costume

He'll be sucking down peanuts and other Halloween treats in no time once disguised in this clever modified-sweat suit costume.

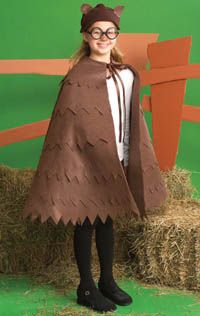
Owl Costume

Whether your kid is a bird-watcher, baseball fan, or budding scholar, she's bound to love this owl costume, which is easy to make and even more easily adapted into other birds.

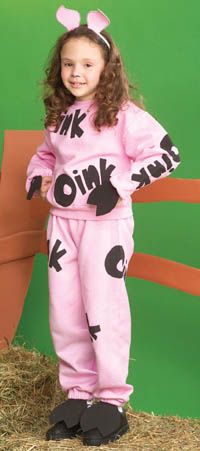
Pig Costume

Everyone's favorite barnyard pal is also the hit of the Halloween party, and a pink sweat suit is nearly all you need.

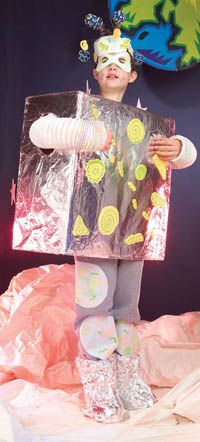
Space Alien Costume

Take us to your candy! Whether you're outfitting one alien or a whole troop, you'll find this easy costume out of this world.

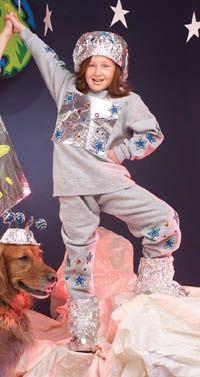
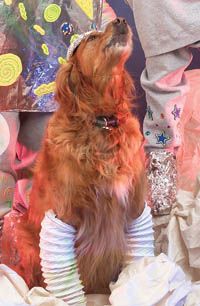
Astronaut and Space Dog Costumes

With a patient pooch, your kid can have a costume-coordinated sidekick for the evening, whether it's space travel or a Halloween party that lies ahead.

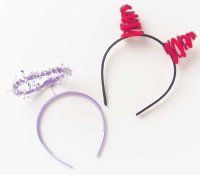
Angel and Devil Headbands

These easy headband costumes can be ready in 15 minutes flat -- or they can serve as a starting point for a more elaborate costume.

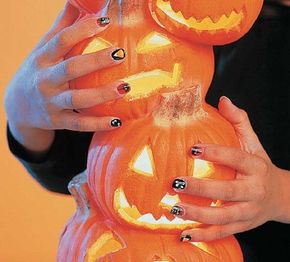
Bewitching Nails

With a few bottles of nail polish and a steady hand, you'll soon have Halloween spirit all the way down to your fingertips.

Feeling inspired yet? Continue to the next page for all you need to make a little girl's dreams of becoming a princess come true...

To learn more about fun and easy Halloween activities, see:
  • Halloween Crafts: Whether hosting a spooky party or looking to keep little goblins entertained, visit this site for easy arts and crafts directions.
  • Halloween Decorations: Bring Halloween holiday spirit to any location when you create these fun and festive decorations.
  • Halloween Masks: For a quick, fun costume and a disguise, follow these tips for creating your own Halloween masks.
  • Halloween Games: There's more to Halloween than eating candy! Get your party guests moving with these ghoulish games.
  • Halloween Recipes: Spooky treats that are good to eat... find out how to concoct delicious delights here.
  • How Halloween Works: Discover the history and traditions behind trick-or-treating and more. Check out this site to learn what Halloween is all about. 
  • How to Go Green: Halloween: Planet Green covers green decorations and costumes for Halloween that are friendly toward the planet.

Advertisement
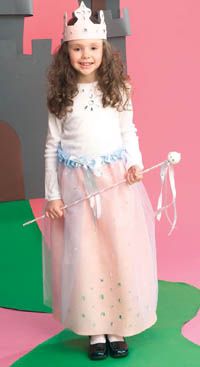
Pretty as a Princess Costume

Your little trick-or-treater can be pretty as a princess in just a few easy steps.

These days feeling like a pretty princess is all the rage, so looking the part is likely to delight your little trick-or-treater. Follow these simple instructions -- and use your child's favorite fairy tales as your inspiration -- to create this no-sew Pretty as a Princess kids' Halloween costume.

What You'll Need
  • Long-sleeved white shirt
  • Assorted faux jewels
  • Fabric glue
  • Pink felt
  • Tape measure
  • Scissors
  • 28 inches pink ribbon, 11/2 inches wide
  • Safety pin
  • 45 inches pink ribbon, 5/8 inch wide
  • Adhesive-back hook-and-loop tape
  • 11/2 yards light blue tulle
  • Waxed paper
  • 55 inches blue ribbon, 11/2 inches wide
  • 70 inches blue ribbon, 5/8 inch wide
  • Poster board
  • Pencil
Instructions
  1. Glue jewels onto white shirt in a necklace pattern. Cut a 27-inch square from pink felt. Glue large jewels along bottom edge of felt.
  2. Fold in ends of 11/2-inch-wide pink ribbon 1/2 inch; glue in place. Lay ribbon along top edge of felt, 1/4 inch down from top. Glue edges of ribbon to felt, leaving center of ribbon unglued. Let dry.
  3. Fasten a safety pin to end of 5/8-inch-wide pink ribbon. Thread it through 1-inch-wide channel created by ribbon glued to felt.
  4. Cut and glue a 3-inch strip of hook-and-loop tape to inside and outside edges of felt to close back. Pull 5/8-inch-wide ribbon to gather skirt around child's waist; tie ribbon into a bow.
  5. Place tulle folded in half (as it comes from the bolt) on waxed paper. Glue small jewels to tulle. Affix blue ribbon to tulle as you did with pink ribbon and felt in step 2. Follow step 3 again to thread 5/8-inch-wide blue ribbon. Place tulle skirt over felt skirt. Pull ribbon to gather tulle around child's waist, then tie a bow in front.
  6. Draw and cut out a crown pattern from poster board. Trace crown onto pink felt; cut out. Glue felt to poster board, and glue jewels to crown. Cut a 3-inch piece of hook-and-loop tape, and adhere it to inside and outside edges of crown for fasteners.

Your pretty princess is now ready for any Halloween-themed ball that comes her way. And if your princess has a fondness for animals (and perhaps a little brother who would like to be a sheep), continue to the next page for easy-to-follow instructions on creating costumes for Little Bo Peep and a few of her woolly friends.

Advertisement

To learn more about fun and easy Halloween activities, see:
  • Halloween Crafts: Whether hosting a spooky party or looking to keep little goblins entertained, visit this site for easy arts and crafts directions.
  • Halloween Decorations: Bring Halloween holiday spirit to any location when you create these fun and festive decorations.
  • Halloween Masks: For a quick, fun costume and a disguise, follow these tips for creating your own Halloween masks.
  • Halloween Games: There's more to Halloween than eating candy! Get your party guests moving with these ghoulish games.
  • Halloween Recipes: Spooky treats that are good to eat... find out how to concoct delicious delights here.
  • How Halloween Works: Discover the history and traditions behind trick-or-treating and more. Check out this site to learn what Halloween is all about.

Advertisement

Bo Peep and Her Sheep Costumes

All this and no sewing? It's easy to create Halloween costumes for Little Bo Peep and one (or more) of her sheep.

Perfect for a set of siblings or a group of friends who want to trick-or-treat together, these simple, no-sew kids' Halloween costumes for Little Bo Peep and her gaggle of sheep will give kids a turn trying to keep an unruly group together. Baaa-ha-ha!

Little Bo Peep
What You'll Need
  • Frilly dress or floral pajama gown
  • 6 yards pink ribbon, 2 inches wide
  • Scissors
  • Hot glue gun, glue sticks
  • 1 yard white lace, 2 inches wide
  • Large plastic holiday candy cane
  • Accessories: slip, white bonnet, lace socks, party shoes
Instructions
  1. To decorate Bo Peep's dress, cut and glue pink ribbon to fit around bottom of dress and sleeve ends. Glue lace on ribbon.
  2. With child wearing dress, tie 2 yards of ribbon around her waist at back. With more pink ribbon, make a small bow and glue it to ribbon in front. Tie another piece of ribbon into a bow, and glue it to front neck of dress. Make another small bow; set aside.
  3. Wrap plastic cane with remaining ribbon, spot-gluing ribbon to cane as you work. Glue ribbon ends in place. Glue remaining bow below curve of cane. Add a pretty slip, bonnet, lace socks, and party shoes.
Bo Peep's SheepWhat You'll Need

Bo Peep's SheepWhat You'll Need

Advertisement

  • White zippered, hooded sweatshirt
  • White sweatpants
  • 10-ounce bag polyester fiberfill
  • Hot glue gun, glue sticks
  • Square black felt
  • Scissors
Instructions
  1. Lay sweatshirt on a flat, protected surface. Use a glue gun to attach small pieces of balled-up fiberfill to arms, back, hood, and front of sweatshirt. Cover sweatshirt completely. Repeat for sweatpants.
  2. Cut two long ears from black felt, and glue one on each side of hood.

Now, just give them a crash course in shepherding and send them on their way. Or, if your kids have something a little more spooky in mind, continue to the next section for tips on bringing out what lies within -- their bones -- for an excellent Halloween costume.

To learn more about fun and easy Halloween activities, see:
  • Halloween Crafts: Whether hosting a spooky party or looking to keep little goblins entertained, visit this site for easy arts and crafts directions.
  • Halloween Decorations: Bring Halloween holiday spirit to any location when you create these fun and festive decorations.
  • Halloween Masks: For a quick, fun costume and a disguise, follow these tips for creating your own Halloween masks.
  • Halloween Games: There's more to Halloween than eating candy! Get your party guests moving with these ghoulish games.
  • Halloween Recipes: Spooky treats that are good to eat... find out how to concoct delicious delights here.
  • How Halloween Works: Discover the history and traditions behind trick-or-treating and more. Check out this site to learn what Halloween is all about.

Advertisement

Bag of Bones Skeleton Costume

Look, Mom. No skin! This easy skeleton costume adds a spark of spook to your kids' Halloween.

Turn up the spook factor and let your kids flaunt what they've got -- on the inside -- with this sinister skeleton kids' Halloween costume. No sewing, stitching, or bandaging required.

What You'll Need
  • Black sweat suit
  • Black gloves
  • White fabric marker
  • White glow-in-the-dark fabric paint
  • Small paintbrush
  • Nontoxic face paints: white and gray or black
Instructions
  1. Using a skeleton illustration as reference (see Haunted Hint below), draw or trace bones in their places on the black sweat suit and gloves with a fabric marker. Let dry, then fill in the bones with glow-in-the-dark paint. Let dry again and paint another coat if necessary for complete, opaque coverage and solid, white bones.
  2. When Halloween arrives, use nontoxic face paints to paint child's face white -- like a skull. Use gray or black paint (and a separate paintbrush!) around the child's eyes and mouth to create "empty" sockets and complete the spooktacular living skeleton effect. And don't forget a spooky hairstyle straight from the grave.

Still not scared? Then what could be better than a ghoulish graveyard ghost? Continue to the next page to transform your child into a shadow of his former self. To learn more about fun and easy Halloween activities, see:

Advertisement

  • Halloween Crafts: Whether hosting a spooky party or looking to keep little goblins entertained, visit this site for easy arts and crafts directions.
  • Halloween Decorations: Bring Halloween holiday spirit to any location when you create these fun and festive decorations.
  • Halloween Masks: For a quick, fun costume and a disguise, follow these tips for creating your own Halloween masks.
  • Halloween Games: There's more to Halloween than eating candy! Get your party guests moving with these ghoulish games.
  • Halloween Recipes: Spooky treats that are good to eat... find out how to concoct delicious delights here.
  • How Halloween Works: Discover the history and traditions behind trick-or-treating and more. Check out this site to learn what Halloween is all about.

Advertisement

Graveyard Ghost Costume

This graveyard ghost costume offers just the scary edge your kid craves.

If a skeleton is just anatomy, and not really all that frightening, scare up some real fun with this graveyard ghost kids' Halloween costume. It couldn't be simpler to make, with no sewing required, and trust us -- it will be a scream!

What You'll Need
  • 24x21-inch cardboard
  • Pencil
  • Box cutter or craft knife (adult use only)
  • Gray spray paint
  • Acrylic paint: light gray, black
  • Sponge
  • Paintbrush
  • White ribbon
  • Scissors
  • Hot glue gun, glue sticks
  • White twin sheet
  • Black or gray sweat suit
  • Nontoxic face paints: white and gray or black
Instructions
  1. Lightly sketch a simple tombstone shape on the cardboard and cut it out with the box cutter. In a well-ventilated area, spray-paint the tombstone gray; let dry 20 to 30 minutes. Dampen a sponge and lightly dip it into light gray paint. Sponge over surface of tombstone to create a mottled appearance. In same manner, lightly sponge black paint as an accent. Draw "R.I.P." or other message in large letters on the tombstone. Paint the letters black and let dry.
  2. Cut a piece of ribbon long enough to go around child's neck, plus 8 inches. Hot glue a ribbon end to each side of tombstone at the top corners.
  3. Dress child in sweat suit. Drape white sheet over child's head to form a hooded cape; trim bottom if necessary. Hang tombstone around child's neck, adjusting hood so it fits comfortably around child's head.
  4. Use nontoxic face paints to paint child's face white. Use gray or black paint around eyes and mouth to complete ghostly, undead effect.

Find additional details about the ghoulish graveyard-dwellers likely to be lurking around on Halloween -- and, more importantly, how you can create their costumes -- on the next page: the werewolf costume.

Advertisement

To learn more about fun and easy Halloween activities, see:
  • Halloween Crafts: Whether hosting a spooky party or looking to keep little goblins entertained, visit this site for easy arts and crafts directions.
  • Halloween Decorations: Bring Halloween holiday spirit to any location when you create these fun and festive decorations.
  • Halloween Masks: For a quick, fun costume and a disguise, follow these tips for creating your own Halloween masks.
  • Halloween Games: There's more to Halloween than eating candy! Get your party guests moving with these ghoulish games.
  • Halloween Recipes: Spooky treats that are good to eat... find out how to concoct delicious delights here.
  • How Halloween Works: Discover the history and traditions behind trick-or-treating and more. Check out this site to learn what Halloween is all about.

Advertisement

Werewolf Costume

They'll have ferociously furry fun trick-or-treating in this no-sew werewolf kids' Halloween costume.

Sometimes it seems like there's an animal living in that bedroom, so use Halloween as your opportunity to bring the truth to light. This easy to make, fun and furry -- yet ferocious -- werewolf kids' Halloween costume strikes just the right balance between tricks and treats.

What You'll Need
  • Black sweat suit
  • Scissors
  • 1/2 yard brown, black, or blended faux animal fur
  • Hot glue gun, glue sticks
  • Index card, painted black
  • Black knit hat
  • Black or brown shoes
  • Nontoxic face paint: brown, black, orange
  • Plastic fangs
  • Plastic black nails
Instructions
  1. Cut a jagged edge along the bottom of the sleeves and legs of a black sweat suit. Cut a 1-inch strip of faux fur to fit around the collar of the sweatshirt, then glue it in place from the inside. Cut jagged holes all over the sweatshirt with scissors, then turn it inside out. Glue patches of fur behind each hole so the fur peeks out through the front. Turn sweatshirt right side out to check the effect, then repeat this process with the pants. Don't worry about the fur shedding all over the black sweat suit -- the hairier, the better!
  2. For the werewolf's ears, cut two pieces of fur (about 4 inches long) into ear shapes, then glue them -- fur side up -- onto the prepared index card. Cut out the ears to give them a cardboard backing, and glue them to the sides of the knit hat. Cut and glue a 1-inch strip of fur to fit around the bottom of the hat. Glue remaining pieces of fur to the shoes.
  3. When it's time to head out for Halloween night, use the face paints to create a werewolf face -- as scary as you like. Have child put on fangs and plastic nails to complete the transformation. Must be a full moon!

Say scary isn't the direction your kid would like to go where her costume is concerned. This next getup is bound to make its wearer the most popular item in the room! Now to choose a ring tone... Visit the next page for instructions on making an easy cell phone kids' Halloween costume.

Advertisement

To learn more about fun and easy Halloween activities, see:
  • Halloween Crafts: Whether hosting a spooky party or looking to keep little goblins entertained, visit this site for easy arts and crafts directions.
  • Halloween Decorations: Bring Halloween holiday spirit to any location when you create these fun and festive decorations.
  • Halloween Masks: For a quick, fun costume and a disguise, follow these tips for creating your own Halloween masks.
  • Halloween Games: There's more to Halloween than eating candy! Get your party guests moving with these ghoulish games.
  • Halloween Recipes: Spooky treats that are good to eat... find out how to concoct delicious delights here.
  • How Halloween Works: Discover the history and traditions behind trick-or-treating and more. Check out this site to learn what Halloween is all about.

Advertisement

Cell Phone Costume

He has no excuse for not phoning home while trick-or-treating.

They're everywhere these days, and your kid may even have one of his own. The cell phone has taken our culture and social lives by storm -- and so will any kid who sports this clever costume for Halloween. Not only is there no sewing needed for this kids' Halloween costume, there's not even any cloth (or electronic components).

What You'll Need
  • Large rectangular cardboard box
  • Heavy-duty masking tape
  • Ruler
  • Pencil
  • Craft knife
  • Red gloss spray paint
  • Optional: spray glitter
  • White paper
  • Black marker or computer printer
  • Scissors
  • 12 plastic containers, 41/2x6 inches each
  • Glue stick
  • 2 yards red ribbon, 1/2 inch wide
  • 5x18-inch black craft foam
  • Hot glue gun, glue sticks
  • Black or red headband
Instructions
  1. Open all of the box's flaps, and tape them so they stand up. Measure down 2 inches from the top of a flap on a longer side. Cut a 12x7-inch opening for face hole. (Armholes will be cut in shorter sides.)
  2. Below the flap fold on the same side as the face hole, measure four rows of three, making 4x5-inch openings at least 1 inch apart and placing openings lengthwise (these will be the buttons). Cut out openings.
  3. For armholes, measure down 8 inches from the top of the box on both sides. Cut out two 6-inch circles with a craft knife.
  4. Add support with tape on the top and bottom of the box where necessary. (If the child is short, you may want to leave bottom flaps untaped for easier movement.) Spray-paint the box red (or another color if you prefer). Let dry, and spray with glitter, if desired.
  5. Draw or print out large numbers using your computer. Make numbers 0 through 9, as well as a star and pound sign. Each letter should be approximately 3-1/2 inches tall. Cut out the numbers and use a glue stick to attach them to inside bottom of the plastic containers. Cut 12 pieces of white paper to the size of the container openings and glue them in place on the openings.
  6. Push each plastic phone key through the back and part-way out the front of each button opening in the cardboard.
  7. Cut four 18-inch pieces of ribbon for shoulder straps. Put the cell phone on the child, and put a mark on the inside of the box approximately 8 inches below the center of the front and back of each shoulder. Glue an end of a ribbon over each mark. Be sure child's arms fit comfortably through the armholes.
  8. To make the antenna, roll black craft foam into a tube and hot glue it in place. Glue an end of antenna to side of a headband.
  9. Slide phone costume over child's head, and tie the ribbons on top of each shoulder to make the straps the correct length. Place headband on child. Proceed to collect lots of candy. (The child, that is, not you.)

If your kid doesn't have a cell phone, perhaps a costume that hits a little closer to home will fit the bill. If there's one thing every kid has, it's a messy drawer. Learn how to make that fact into a costume on the next page.

Advertisement

To learn more about fun and easy Halloween activities, see:
  • Halloween Crafts: Whether hosting a spooky party or looking to keep little goblins entertained, visit this site for easy arts and crafts directions.
  • Halloween Decorations: Bring Halloween holiday spirit to any location when you create these fun and festive decorations.
  • Halloween Masks: For a quick, fun costume and a disguise, follow these tips for creating your own Halloween masks.
  • Halloween Games: There's more to Halloween than eating candy! Get your party guests moving with these ghoulish games.
  • Halloween Recipes: Spooky treats that are good to eat... find out how to concoct delicious delights here.
  • How Halloween Works: Discover the history and traditions behind trick-or-treating and more. Check out this site to learn what Halloween is all about.

Advertisement

Messy Drawer Costume

Who knew messy could be so cute?

If you've told her once, you've told her a thousand times: Clean up that room! Or perhaps it's the kitchen junk drawer that provides the inspiration for this kids' Halloween costume. But no matter who made the mess, you'll put it to good use making this easy, no-sew messy drawer costume that's bound to result in abundant laughter -- and abundant candy!

What You'll Need
  • Brown sweatpants and a colorful sweatshirt
  • Black fabric paint
  • Paintbrush
  • Long, narrow cardboard box, such as a full sheet cake box, with lid detached
  • Scissors
  • Acrylic paint: brown, black
  • Toilet paper roll
  • Hot glue gun, glue sticks
  • Small, lightweight household items: facial tissue, crumpled papers, notepad, message slips, batteries, puzzle pieces, plastic toys, socks, keys, cards, tape, tickets, stamps, photos, school report cards, letters from teacher, small phone book, crayons, etc.
  • Bright baseball cap
  • 2 yards wired ribbon, 2 inches wide
  • Duct tape
Instructions
  1. Wash sweatpants and sweatshirt. Do not use fabric softener. Paint black lines on pants to create wood grain. (If you can't find brown sweatpants, dye white pants brown. Follow instructions on dye box.)
  2. Cut a small semicircle out of back of box for child's body. Paint box brown, inside and out. Repaint if necessary for complete coverage. When dry, paint black lines along sides of box to create wood grain.
  3. For drawer handle, cut toilet paper roll in half lengthwise and discard half. Paint other half black. Let dry. Glue it to center front of drawer.
  4. Hot glue household items inside drawer. Overlap some items and have others pouring out of sides and front. Randomly glue smaller items to baseball cap. Also glue a few items to the sweatshirt.
  5. To make drawer easy to tote, cut a slit on each side of box, attach ribbon, and secure ribbon with duct tape. Box will hang like a peanut vendor's box at a ball game.
  6. Don't forget to add messy hair to complete the outfit!

Nothing like using a mess to its maximum potential. And for even more fun, easy kids' Halloween costume potential, check out the next page for tips on a pencil costume with the write stuff!

Advertisement

To learn more about fun and easy Halloween activities, see:
  • Halloween Crafts: Whether hosting a spooky party or looking to keep little goblins entertained, visit this site for easy arts and crafts directions.
  • Halloween Decorations: Bring Halloween holiday spirit to any location when you create these fun and festive decorations.
  • Halloween Masks: For a quick, fun costume and a disguise, follow these tips for creating your own Halloween masks.
  • Halloween Games: There's more to Halloween than eating candy! Get your party guests moving with these ghoulish games.
  • Halloween Recipes: Spooky treats that are good to eat... find out how to concoct delicious delights here.
  • How Halloween Works: Discover the history and traditions behind trick-or-treating and more. Check out this site to learn what Halloween is all about.

Advertisement

Pencil Costume

Hey -- that kid is sharp.

Not to put too fine a point on it, but this larger-than-life kids' Halloween costume is ideal for a budding young scholar. For guaranteed giggles -- and an assurance that you'll have the sharpest trick-or-treater on the block -- gather just a few supplies (no sewing required) and create this simple but clever pencil kids' Halloween costume.

What You'll Need
  • 47x42-inch thin foam
  • Ruler
  • Pencil
  • Spray paint: light brown, yellow
  • Heavy-duty aluminum foil
  • Scissors
  • Permanent fabric adhesive
  • Permanent black marker
  • Roll adhesive hook-and-loop tape, 1 inch wide
  • Roll black elastic, 1 inch wide
  • White poster board
  • Acrylic paint: black, light tan
  • 1-inch flat paintbrush
  • White elastic, 1/4 inch wide
Instructions
  1. Measure in 8 inches along 47-inch edge of foam. Spray-paint this area light brown for the eraser; spray-paint remaining area yellow.
  2. Cut a 47x6-inch piece of foil. Glue foil above eraser. Measure and with a black marker make horizontal lines 2 inches apart, starting at the bottom edge of the foil and ending at the top edge.
  3. With a black marker, draw vertical broken lines 4 inches apart across yellow portion of foam. Write "No. 2" vertically on the pencil (see photo).
  4. Cut a 6-inch length of hook-and-loop tape, and attach it to top of both sides of back of pencil (be sure tape matches up when closing pencil).
  5. To make armholes, lay pencil flat with closure in center back. Measure down 5 inches from top, and cut 7-inch-diameter semicircles on right and left sides of the pencil.
  6. Cut two 12-inch strips of black elastic and four 2-inch pieces of hook-and-loop tape. Put pencil on child and make marks on inside of foam approximately 4 inches below center of front and back of each shoulder. Stick hook-and-loop tape inside front and back of pencil over marks. Stick other side of hook-and-loop tape along end of elastic so pencil fits child well (trim elastic if needed).
  7. To make pencil tip, cut out a large circle from poster board. Cut out a pie-shaped piece from circle, and hold cut edges together to form a cone. Try cone on child's head, and trim if too big. Glue cut edges when the pencil tip hat is the correct size. Paint the tip black for pencil lead, and paint the remainder light tan. Cut a piece of white elastic to fit underneath the child's chin, and glue each end to the right and left insides of the hat.

If comedy seems to be your kid's calling, continue to the next section for a creative twist on a Halloween classic: the clown costume.

Advertisement

To learn more about fun and easy Halloween activities, see:
  • Halloween Crafts: Whether hosting a spooky party or looking to keep little goblins entertained, visit this site for easy arts and crafts directions.
  • Halloween Decorations: Bring Halloween holiday spirit to any location when you create these fun and festive decorations.
  • Halloween Masks: For a quick, fun costume and a disguise, follow these tips for creating your own Halloween masks.
  • Halloween Games: There's more to Halloween than eating candy! Get your party guests moving with these ghoulish games.
  • Halloween Recipes: Spooky treats that are good to eat... find out how to concoct delicious delights here.
  • How Halloween Works: Discover the history and traditions behind trick-or-treating and more. Check out this site to learn what Halloween is all about.

Advertisement

Clown Costume

Cute and creative clown costume with no sewing machine required.

Halloween is truly all about fun, so what could be better than a costume guaranteed to bring a smile? The clown is a classic among kids' Halloween costumes, but that doesn't mean it has to be boring -- or difficult to make. Trade a few of your favorite knock-knock jokes with your kid as you concoct this easy, inexpensive clown suit.

What You'll Need
  • Hot-pink sweatshirt
  • Blue sweatpants
  • Acrylic paint: green, yellow, violet, white, orchid, hot pink
  • Sponge pouncer: large, small
  • Paintbrushes: 1/2-inch flat, round size 2, shader size 2
  • Ruler
  • Black permanent marker
  • Felt: white, yellow, hot pink
  • Scissors
  • Rickrack: medium purple and yellow, jumbo blue and green
  • Permanent fabric adhesive
  • White crochet thread
  • Large-eye needle
  • 11/2x6-inch piece heavy cardboard
  • Yarn: yellow, green
  • Sewing pins
  • White pom-pom trim
Instructions
  1. Wash and dry sweatshirt and sweatpants. Do not use fabric softener.
  2. Use large sponge pouncer to sponge green circles randomly on front and back of sweatshirt. Let dry. With end of a large paintbrush, make a yellow dot in center of each green circle. Use small pouncer to sponge violet circles randomly on front and back of sweatshirt. Let dry. Use end of a paintbrush to make white dots on shirt.
  3. Paint 11/2-inch vertical yellow stripes (or make lines depth of band) 1/2 inch apart across bottom band of sweatshirt. Use end of a paintbrush to make small orchid dots on top between each vertical stripe. Let dry.
  4. Use 1/2-inch paintbrush to paint vertical wavy hot-pink stripes approximately 11/2 inches apart on pants. Let dry. Paint yellow horizontal dashes across every other hot-pink stripe. Use end of a paintbrush to make white dots between wavy stripes. With black marker, draw horizontal lines 11/2 inches apart between white dots. Let dry, then heat-set the paint by putting shirt and pants in dryer for about 30 minutes.
  5. To make collar ruffle, cut two 42x7-inch pieces of white felt. Fold 42-inch edge over 3 inches on one piece of felt and 4 inches on the other; pin in place. On opposite 42-inch edge, glue purple rickrack on piece folded over 4 inches and blue rickrack on the other piece. Let dry. Overlap pieces, and use needle and crochet thread doubled to sew large gathering stitches along folded edges of felt. Pull to gather, and tie around child's neck in a loose bow in back.
  6. To make sleeve ruffles, cut two 20x5-inch pieces of white felt. Fold 20-inch edge over 2 inches on one piece of felt and 1 inch on the other; pin in place. On opposite 20-inch edge, glue yellow rickrack on piece folded over 2 inches and green rickrack on the other piece. Let dry. Overlap pieces, and use needle and crochet thread doubled to sew large gathering stitches along folded edges of felt. Pull to gather, and tie around wrist in a loose bow. Repeat for other cuff.
  7. To make ankle ruffles, repeat instructions for sleeve cuffs, but cut two 20x7-inch pieces of white felt for each cuff.
  8. To make hat brim, cut a 14-inch yellow felt circle, and cut a 61/4-inch opening in center. Cut a 21x91/2-inch piece of yellow felt, and glue 91/2-inch ends together. Fold one edge of hat over and glue to create hat top. Cut a 21x21/2-inch piece of hot-pink felt, and glue around bottom edge of hat as a hatband. Glue blue rickrack in center of hot-pink hatband. Glue hat to brim.
  9. Wrap yellow yarn around short side of cardboard 100 times. Slip a 12-inch piece of yarn between cardboard and yarn along short side of cardboard, and tie yarn tightly. Cut yarn along opposite edge of cardboard. Make two yellow poms. Trim poms, and pin to front of sweatshirt. Make three more poms, using green and yellow yarn. Tie a green-and-yellow pom to each shoe, and glue the third to the hatband.
  10. Sew or glue pom-pom trim to bottom of sweatshirt.

That's the spirit! That floppy hat is bound to bring a smile. For another new spin on a Halloween classic, click to the next page, where you'll learn to create no-sew gypsy mystique.

Advertisement

To learn more about fun and easy Halloween activities, see:
  • Halloween Crafts: Whether hosting a spooky party or looking to keep little goblins entertained, visit this site for easy arts and crafts directions.
  • Halloween Decorations: Bring Halloween holiday spirit to any location when you create these fun and festive decorations.
  • Halloween Masks: For a quick, fun costume and a disguise, follow these tips for creating your own Halloween masks.
  • Halloween Games: There's more to Halloween than eating candy! Get your party guests moving with these ghoulish games.
  • Halloween Recipes: Spooky treats that are good to eat... find out how to concoct delicious delights here.
  • How Halloween Works: Discover the history and traditions behind trick-or-treating and more. Check out this site to learn what Halloween is all about.

Advertisement

Gypsy Costume

This gypsy will steal your heart.

There have been gypsy Halloween costumes for almost as long as there have been gypsies, but they remain a fun and exotic kids' Halloween costume favorite. Even boys can hop on the gypsy bandwagon if you adapt this costume to have a more pirate-like flair. And, these easy outfits can be created on a gypsy's budget. Is that a tambourine I hear?

What You'll Need
  • 6 gold foil doilies with solid centers, 12 inches each
  • Scissors
  • Double-sided tape or glue stick
  • Tape measure
  • White felt
  • Fabric glue
  • Adhesive hook-and-loop tape
  • Brown paper (such as grocery bags)
  • Pencil
  • 2/3 yard burgundy felt, 45 inches wide
  • Straight pins
  • Fabric scissors
  • 4 yards gold rickrack
  • 21/2 yards patterned fabric
  • Iron, ironing board
  • Liquid fusible webbing
  • 11/2 yards cording
  • Gold cardstock
  • Clip-on earring backs
  • Accessories: lace scarf for head, black sash for waist, white long-sleeved T-shirt, black tights
Instructions
  1. Cut doilies in half; cut away solid centers. For the jabot, you will need five doily halves. With first doily half, fold sides back so doily is about 6 inches wide, with gold side on top; adhere sides with double-sided tape or glue stick. For second doily half, fold sides back, with white side on top. Tape or glue as before. Keep repeating instructions until all 5 doily halves have been taped, alternating between gold and white sides.
  2. Tape first doily half to back of first, placing it 2 inches below top. Continue until all doily halves have been taped together. Measure around child's neck and add 4 inches. Cut a 2-inch strip of white felt this length. Glue top edge of doily jabot to middle of felt length. Add hook-and-loop tape to ends of strip to close around child's neck.
  3. For cuffs, layer three doily halves, placing each 1/2 inch below the last. Tape doilies together, and trim them so they fit around child's wrist. Make two. Cut two 2x8-inch strips of white felt. Glue straight edge of doilies to felt. Add hook-and-loop tape at ends of felt.
  4. Draw a vest pattern on brown paper; cut it out and be sure it fits child. Pin pattern on burgundy felt, and cut out. Glue shoulders together. Glue sides together. Glue gold rickrack along all edges.
  5. Fold over edge of patterned fabric 7/8 inch to form skirt waistband; iron flat. Working with a small area, apply liquid fusible webbing to edge of the folded fabric (be sure you keep the channel unglued). Press together, and iron to fuse following manufacturer's instructions. Thread cording through channel of waistband, gathering skirt as you go. Hem skirt with fusible webbing to desired length. Add hook-and-loop tape strips along side edges of skirt. Tie cording at side of waist, and close side with hook-and-loop tape.
  6. Cut two hoops from gold cardstock, and glue one to the front of each clip-on earring backing. Make them as large and fancy as you'd like!
  7. Tie a lace scarf (or a remnant of lacy material) around the child's head, and tie black lacy sash (or another remnant of lacy material) around child's waist to complete the costume. Haunted Hint Tie fun ribbons of many colors to a tambourine to complete the exotic gypsy look.

For a more contemporary twist on Halloween, give a nod to NASCAR and continue to the next page to outfit your little Dale or Danica in full racing style -- including a customized car to trick-or-treat in!

To learn more about fun and easy Halloween activities, see:
  • Halloween Crafts: Whether hosting a spooky party or looking to keep little goblins entertained, visit this site for easy arts and crafts directions.
  • Halloween Decorations: Bring Halloween holiday spirit to any location when you create these fun and festive decorations.
  • Halloween Masks: For a quick, fun costume and a disguise, follow these tips for creating your own Halloween masks.
  • Halloween Games: There's more to Halloween than eating candy! Get your party guests moving with these ghoulish games.
  • Halloween Recipes: Spooky treats that are good to eat... find out how to concoct delicious delights here.
  • How Halloween Works: Discover the history and traditions behind trick-or-treating and more. Check out this site to learn what Halloween is all about.

Race Car Driver Costume

Look out! No time for a pit stop. There's candy ahead!

Ladies and gentlemen, start your engines! But not your sewing machines. Even the tiniest trick-or-treaters will wow the competition when they show up on Halloween with their own transportation. What kid wouldn't like to be a race car driver? And you can rest assured that no mechanic's background is required to construct this kids' Halloween costume.

What You'll Need
  • Black sweat suit
  • Black baseball cap
  • Acrylic paint: assorted colors
  • Fabric paintbrushes
  • Fabric markers (or paint and liner brush)
  • Short rectangular box
  • Box cutter (adult use only)
  • Yardstick
  • Strong masking tape
  • 2 plastic containers, 4-1/2x6 inches each
  • White fun foam
  • Gray plastic or fun foam
  • Hot glue gun, glue sticks
  • "Egg-cup" packing foam
  • Black spray paint
  • Scissors
  • Black ribbon
Instructions
  1. Wash and dry sweat suit. Do not add fabric softener.
  2. Paint a 3-inch yellow vertical stripe down outside of each pant leg. Paint a large rectangle across front of shirt. Paint geometric shapes all over sweat suit and on front of cap using assorted colors of paint; overlap some shapes. Let dry.
  3. With fabric markers, write racing words in the centers of shapes: use words such as Top Pick, Start, Lap, Speed, Drive, Luck, The Favorite, Spoiler, Strong Run, Win, Finish, Tough, Victory, Crew, Go, Fast, and Leader. Paint "Winner" in rectangle across front of shirt, and add vertical stripes before and after the word. Paint large purple and thin red horizontal stripes on yellow leg stripes. Let dry.
  4. The shorter sides of rectangular box will be the back and front of the car. Cut bottom flaps off box, along with top side flaps and back flap; leave front flap attached. Trim bottom of box to size you'd like car, leaving two rounded "wheels" on each side.
  5. Turn a longer box flap (cut off in step 4) lengthwise, and place long edge along back of box, centering it. Mark box length on flap. Measure and mark lines 31/2 inches up from first markings. Then mark horizontal lines out to both edges of flap. Cut along lines, creating a T shape. Attach bottom of T to inside of car with masking tape. Fold top of T down to make spoiler. (If flap is too long or wide, trim ends or width.) Reinforce folds with masking tape.
  6. Bring front flap down over front of box, and mark front window holes by tracing around plastic containers. Cut out holes. Paint car however you'd like. (Paint the front of the front flap and the front of the box the same color.)
  7. Cut out two 3-inch circles of fun foam. Place plastic containers in front flap holes, and glue white foam circles below this for headlights. Cut out a piece of gray plastic to fit around front flap extending about 2 inches on either side. Glue gray plastic to bottom of front flap, and attach extended edges to sides of box.
  8. Cut packing foam into four strips to fit around "wheels" on sides of car. Spray-paint foam black; let dry. Glue foam to wheels, making sure foam ridges are on outside of wheels. Place car on child, and measure length needed to make ribbon harness. Cut two pieces of ribbon this length, and glue ribbon ends to front and back of car on right and left sides.

On your mark, get set, go have some Halloween fun! And if you have a kid who's into animals, not engines, click to the next page and try our easy elephant costume on for size.

To learn more about fun and easy Halloween activities, see:
  • Halloween Crafts: Whether hosting a spooky party or looking to keep little goblins entertained, visit this site for easy arts and crafts directions.
  • Halloween Decorations: Bring Halloween holiday spirit to any location when you create these fun and festive decorations.
  • Halloween Masks: For a quick, fun costume and a disguise, follow these tips for creating your own Halloween masks.
  • Halloween Games: There's more to Halloween than eating candy! Get your party guests moving with these ghoulish games.
  • Halloween Recipes: Spooky treats that are good to eat... find out how to concoct delicious delights here.
  • How Halloween Works: Discover the history and traditions behind trick-or-treating and more. Check out this site to learn what Halloween is all about.

Elephant Costume

Small but mighty. Anyone can be an elephant with this easy, no-sew costume.

Perhaps you've had to say no to owning an elephant, but what about becoming one for a day? Kids love animals, and they love to pretend, so once you've made this easy, no-sew elephant kids' Halloween costume, stand back and see where imagination takes them. This costume also works great for a whole herd, as they can link trunks and stay together. Just look out for peanut allergies.  

What You'll Need
  • Gray sweatpants and sweatshirt
  • Additional size 16 gray sweatshirt
  • Ruler
  • Scissors
  • Adult baseball cap
  • Fabric adhesive
  • Poster board
  • Pencil
  • Hot glue gun, glue sticks
  • Two wooden balls, 3/4-inch diameter each
  • Acrylic paint: black, white, red
  • Paintbrushes: 1/4-inch flat, fabric bristle
  • Peanuts
Instructions
  1. Wash and dry all sweats; do not use fabric softener. Cut a 13x20-inch piece of fleece from bodice of the size 16 sweatshirt. Glue to top of cap, gluing fleece edges underneath edges of cap. Add wrinkles for texture.
  2. Cut off a sleeve from the size 16 sweatshirt. Fold cut edge under, and glue sleeve over brim of cap for trunk.
  3. On poster board, draw two large elephant ears and cut them out. (Make a 11/2-inch long tab on narrow ends for inserting into cap.) Trace four ears on the size 16 sweatshirt. Cut them out. Glue fleece to front and back of each poster-board ear.
  4. Make a 11/2-inch slit on each side of the cap, 1 inch up from the bottom edge. Poke ear tabs into the slits, and hot glue tabs on the inside of the cap.
  5. Paint wooden balls black, and add a white dot for a highlight on each. Hot glue balls to the top of the cap for eyes.
  6. With bristle brush, lightly paint cheeks, ear centers, and the end of the trunk red. Glue a peanut to the end of the trunk, and glue other peanuts to shirt and pants. Now send the elephant out to collect other tasty Halloween treats.

Ready for more fun in the animal kingdom? And wouldn't it be fun to fly? On the next page you'll learn to transform your kid into a feathered friend.

To learn more about fun and easy Halloween activities, see:
  • Halloween Crafts: Whether hosting a spooky party or looking to keep little goblins entertained, visit this site for easy arts and crafts directions.
  • Halloween Decorations: Bring Halloween holiday spirit to any location when you create these fun and festive decorations.
  • Halloween Masks: For a quick, fun costume and a disguise, follow these tips for creating your own Halloween masks.
  • Halloween Games: There's more to Halloween than eating candy! Get your party guests moving with these ghoulish games.
  • Halloween Recipes: Spooky treats that are good to eat... find out how to concoct delicious delights here.
  • How Halloween Works: Discover the history and traditions behind trick-or-treating and more. Check out this site to learn what Halloween is all about.

Owl Costume

Make this feathered costume without any sewing needed.

An excellent ensemble for budding scholars -- or just smarty-pants -- this wise old owl Halloween costume gives any kid who wears it a knowing look. For bird-lovers of other stripes (or baseball fans for that matter), check out the Haunted Hint below for tips on adapting this easy, no-sew kids' Halloween costume from an owl to the bird of your choice, be it a cardinal, oriole, or bluebird.


What You'll Need
  • Two 21/4-yard lengths of brown felt, 72 inches wide
  • Chalk or white fabric pencil
  • 1 yard string
  • Fabric scissors
  • Quick-drying fabric glue
  • 1 yard brown ribbon
  • Brown knit cap
  • Black or brown tights
  • White long-sleeved leotard
Instructions
  1. Fold felt in half lengthwise. Tie an end of the string to the piece of chalk. Tie a knot 31/2 inches from the chalk. To make the cape's neckline, hold the knot at the folded corner, pull string taut, and draw a curve from fabric edge to fabric edge. For the bottom of the cape, make a knot in the string 32 inches from the chalk. Again, hold this knot at the same folded corner, and draw a curve as before. Cut on the top line, and on the bottom line, cut Vs along the edge for feathers.
  2. Fold the second piece of felt in half lengthwise. Use a 31/2-inch knot to make the neckline as you did with the first felt. Then make a knot at 6 inches, 12 inches, 18 inches, 24 inches, and 32 inches from the chalk. Cut on all the lines, but cut Vs on the 32-inch line. Then, at the bottom of each piece, cut additional Vs. Beginning 6 inches up from the bottom of the cape, glue these felt layers onto the cape, overlapping each layer slightly. Cut the brown ribbon in half and glue it to the inside edges of the cape's neckline for ties.
  3. Cut two ears from brown felt scraps; make a small vertical slit in the bottom of each ear. Fold slit ends over each other, and glue together with fabric glue. Glue ears to the knit cap.
  4. Have child wear black or brown tights and a white leotard for the owl's body. Add round glasses with black frames for a wise look!

For one more animal option, visit the next page and create the simplest of costumes inspired by a curly-tailed barnyard favorite: the pig.To learn more about fun and easy Halloween activities, see:

  • Halloween Crafts: Whether hosting a spooky party or looking to keep little goblins entertained, visit this site for easy arts and crafts directions.
  • Halloween Decorations: Bring Halloween holiday spirit to any location when you create these fun and festive decorations.
  • Halloween Masks: For a quick, fun costume and a disguise, follow these tips for creating your own Halloween masks.
  • Halloween Games: There's more to Halloween than eating candy! Get your party guests moving with these ghoulish games.
  • Halloween Recipes: Spooky treats that are good to eat... find out how to concoct delicious delights here.
  • How Halloween Works: Discover the history and traditions behind trick-or-treating and more. Check out this site to learn what Halloween is all about.

Pig Costume

How much candy can this little piggy eat?

Whether it's Babe or Wilbur or cute little pink pigs at the petting zoo that are your kids' favorite, they'll likely jump (and possibly squeal) at the chance to trick-or-treat as this beloved barnyard pal. With little more than a sweat suit and some scissors, you can create this no-sew kids' Halloween costume that's sure to bring home the blue ribbon.

What You'll Need
  • Pink sweatshirt and sweatpants
  • Heavyweight paper
  • Pencil
  • Craft knife
  • Black fabric paint
  • 1/2-inch flat paintbrush
  • Craft foam: pink, black
  • Scissors
  • Permanent black marker
  • Pink headband
  • Hot glue gun, glue sticks
  • 1/8-inch black elastic
  • Black or pink chenille stem
  • Safety pin
  • Duct tape
  • Optional: paper towel roll
Instructions
  1. Wash and dry sweatshirt and sweatpants; do not use fabric softener. Write "Oink" on heavy paper in fun, thick lettering. Cut out inside of letters with a craft knife to create a stencil. Place stencil in several places on shirt and pants, and paint the letters black. Follow manufacturer's instructions to set the paint.
  2. Draw two ears on pink foam, and cut them out. Outline ears with black marker. Hot glue ears to headband.
  3. Draw four hooves on black foam, and cut them out. Poke two small holes on either side along top straight edge of each hoof. Tie an end of elastic through each hole, creating a bracelet-like attachment. Be sure elastic stretches easily yet fits snugly over child's wrists and feet before cutting elastic and tying a knot in the second hole.
  4. To curl tail, twist chenille stem around a marker. Poke the end of the stem through the back seam of the sweatpants, and pin it to the inside. Cover the pin with duct tape to protect the child.
  5. Optional: To make a snout, cut off a 2-inch piece from a paper towel roll. Cut a strip of pink foam to fit around the roll, and glue it in place. Cut a piece of black foam to cover the end of the roll, and glue it in place. Use a black marker to draw nostrils and outline the end of the snout. Make two small holes in either side of the snout. Cut elastic to fit around the child's head, and tie elastic ends in holes.

Sure, this pig costume is great, but if your kid is interested in something truly out of this world, keep clicking. On the next page you'll learn to make an easy space alien kids' Halloween costume, no space travel required.

To learn more about fun and easy Halloween activities, see:
  • Halloween Crafts: Whether hosting a spooky party or looking to keep little goblins entertained, visit this site for easy arts and crafts directions.
  • Halloween Decorations: Bring Halloween holiday spirit to any location when you create these fun and festive decorations.
  • Halloween Masks: For a quick, fun costume and a disguise, follow these tips for creating your own Halloween masks.
  • Halloween Games: There's more to Halloween than eating candy! Get your party guests moving with these ghoulish games.
  • Halloween Recipes: Spooky treats that are good to eat... find out how to concoct delicious delights here.
  • How Halloween Works: Discover the history and traditions behind trick-or-treating and more. Check out this site to learn what Halloween is all about.

Space Alien Costume

So they're not little green men?

Give the term "space race" new meaning when this little space alien heads out to collect some candy. This easy, no-sew kids' Halloween costume is a snap to make and provides unlimited opportunities for creativity, as no one has actually seen a space alien -- right?

What You'll Need
  • Gray sweatpants
  • White T-shirt
  • Winter boots 
  • 1/4 yard white fabric
  • Craft foam: white, yellow
  • Pencil
  • Scissors
  • Glow-in-the-dark dimensional fabric paint: yellow, orange, green
  • Hole punch
  • Elastic cord
  • Three foam balls, 2 inches in diameter
  • Dark blue acrylic paint
  • Paintbrush
  • Double-sided iron-on fusible webbing
  • Iron, ironing board
  • Cardboard box to fit child
  • Box cutter (adult use only)
  • Heavy-duty aluminum foil
  • Tape: 2-inch heavy-duty clear, 1/2-inch double-sided, duct, yellow electrical
  • Hot glue gun, glue sticks
  • Neon blow pens: yellow, green, pink, orange
  • Flexible vinyl duct, 4 inches wide
  • 1-gallon white milk jug
  • 14-gauge wire: copper, silver
  • Two wooden dowels: 1 inch, 5/16 inch
  • Wire cutters
  • Large needle
  • Pliers
  • 20-gauge wire: green
  • Small piece quilt batting
Instructions
  1. Wash and dry sweatpants, T-shirt, and white fabric; do not use fabric softener.
  2. Draw a mask on white craft foam, and cut out. Be sure eye holes are large enough for child to see out. Outline and decorate mask with dimensional paint. Let dry 12 hours. Punch holes in either side of mask, and tie elastic cord in holes.
  3. Use dimensional paint to draw squiggles on yellow foam. Let dry 12 hours. When dry, cut out around squiggles, creating different geometric shapes.
  4. Paint foam balls blue; let dry. Use dimensional paint to make squiggles on balls. Let dry 12 hours.
  5. Following manufacturer's directions, fuse webbing to back of white fabric. Draw four oval shapes on fabric, and cut out. Fuse fabric to sweatpants, one oval on thigh and one on shin of each leg. Use dimensional paint to draw squiggles and dots on fabric. Let dry 12 hours.
  6. Use box cutter to remove bottom of box. Cut holes for neck and arms. Cover box with foil using clear tape and hot glue. Use blow pens to add swirls of color to front of box. Use double-sided tape to attach foam shapes to the box front. (Save a few smaller shapes for the helmet.)
  7. Cut two pieces of vinyl duct the length of child's arms. Fold plastic to inside, and cover with clear tape. Use clear tape to attach duct to ends of T-shirt sleeves. Stretch duct to full length, and use blow pens to decorate.
  8. Cut milk jug below handle, about 31/2 inches up from the base of the jug, and continue cutting around jug. Bottom of jug will be the helmet. Cut slits at corners if jug is too small to fit child's head. Use blow pens to color the helmet.
  9. Coil 14-gauge wire around the 1-inch dowel to make 3 inches of coil with 1 inch of straight wire at each end. Make as many coils as you'd like. Wrap double-sided tape to an end of a wire, and stick the end into a foam ball. Make three. Poke holes in the milk jug with a needle. Push the ends of the wire coils through the hole, and use pliers to bend wires flat against the carton. Cover wire ends with duct tape. Use double-sided tape to attach foam shapes to helmet.
  10. Coil 20-gauge wire around 5/16-inch dowel, and attach foam circles to an end using yellow electrical tape. Attach coils to helmet as in step 9. Hot glue batting to inside of helmet to protect child's head.
  11. Use foil to create moon boots. Cut a large piece of foil, and wrap around boot, taping in back to hold foil in place. Repeat for other leg.

With your alien being fully outfitted, send him from the mother ship to acquire candy in a target-rich environment. Or, if you've got a whole slew of space fanatics, create an alien force, then continue to the next page to blast off a couple of astronaut costumes -- even one for the family dog.

To learn more about fun and easy Halloween activities, see:
  • Halloween Crafts: Whether hosting a spooky party or looking to keep little goblins entertained, visit this site for easy arts and crafts directions.
  • Halloween Decorations: Bring Halloween holiday spirit to any location when you create these fun and festive decorations.
  • Halloween Masks: For a quick, fun costume and a disguise, follow these tips for creating your own Halloween masks.
  • Halloween Games: There's more to Halloween than eating candy! Get your party guests moving with these ghoulish games.
  • Halloween Recipes: Spooky treats that are good to eat... find out how to concoct delicious delights here.
  • How Halloween Works: Discover the history and traditions behind trick-or-treating and more. Check out this site to learn what Halloween is all about.

Astronaut and Space Dog Costumes

To the Halloween party and beyond!

Whether it's imagining the galaxy's outer limits or learning about planets in science class, space captivates nearly every kid at one time or another. If that time happens to be now, your trick-or-treater will be thrilled to represent NASA on their latest candy-gathering mission in this easy astronaut kids' Halloween costume. And, if the family dog is your kids' trusty sidekick, why not include him in the Halloween fun?

Astronaut
What You'll Need
  • Gray sweatshirt and sweatpants
  • Dark-blue craft foam
  • Pen
  • Glow-in-the-dark dimensional fabric paint: yellow, green
  • Paintbrush
  • Scissors
  • 8x10-inch piece cardstock
  • Heavy-duty aluminum foil
  • Tape: 2-inch clear tape, double-sided, duct
  • Jewels: assorted colors and sizes
  • Metal glue
  • Quilt batting
  • Baseball cap
  • Winter boots
Instructions
  1. Wash and dry sweatshirt and sweatpants; do not use fabric softener.
  2. Draw 17 stars on blue foam. Use yellow and green paint to outline stars. Let dry 12 hours. Cut out stars.
  3. Cover 8x10-inch cardstock with aluminum foil using clear tape to secure. Use double-sided tape to attach stars to corners of foil. Use metal glue to attach jewels. Use double-sided tape to attach foil piece to front of sweatshirt. Attach stars and jewels to arms of sweatshirt and legs of sweatpants in same manner.
  4. Wrap quilt batting around cap, filling in space over bill of cap (bill is back of helmet). Cover with foil. Crimp foil under edge of cap, and secure with duct tape. Attach stars to helmet with double-sided tape and jewels to helmet with metal glue.
  5. Use foil to create moon boots. Cut a large piece, and wrap around boot, taping in back to hold foil in place. Repeat for other leg.
Space Dog
Look how patient I am! And have I mentioned that I love Halloween candy? Arf!
What You'll Need
  • Three foam balls, 11/2 inches in diameter
  • 51/2-inch plastic bowl
  • White elastic cord
  • 20-gauge wire: green, gold
  • 26-gauge wire: hot pink, hot yellow, teal
  • Wood dowels: 5/16 inch, 1/2 inch
  • Flexible vinyl duct, 4 inches wide
  • Other supplies from the astronaut costume will also be needed for this doggy getup.
Instructions
  1. Paint foam balls blue. Let dry. Use dimensional paint to make squiggles and dots on the balls. Let dry 12 hours.
  2. Cover outside of bowl with aluminum foil. Punch holes in rim on opposite sides of bowl. Cut two lengths of elastic cord long enough to tie under dog's chin. Tie cord ends into holes in rim.
  3. Coil 20-gauge wire around 5/16-inch dowel making approximately 3 inches of coil with 1/2 inch of straight end on each side of wire. Make three coils. Cover a straight end of the wire with double-sided tape, and push it into a foam ball. Repeat for the other two foam balls and coils.
  4. Use large needle to make holes in the middle top of the helmet. Push the other straight ends of the wires through the holes, and flatten them against helmet using pliers. Cover wire ends on inside of bowl with duct tape.
  5. Use 1/2-inch dowel to make three coils from 26-gauge wire by tightly wrapping all three colored wires at the same time around the dowel. Spread and twist the coils to make approximately 3-inch coils with a 1/2-inch straight end on each coil.
  6. Use needle to make holes in helmet, and attach coils to helmet as you did in step 4.
  7. Cut two lengths of vinyl duct as long as the dog's front legs. Fold excess plastic over cut ends of wire to the inside, and cover with clear tape. Stretch duct out, and use blow pens to decorate.
  8. Use hole punch to make a hole through top of duct where taped, and tie a length of elastic cord long enough to go from top of one legging over dog's back to top of other legging. Make a hole in second legging.
  9. Put leggings on dog, positioning holes at outside of dog's legs. Tie elastic cord through second hole to hold leggings in place.

Kids love to wait until the last minute, so if you've just learned you're on costume-creating duty and don't have enough time to pull together any of these previously presented kids' Halloween costumes, don't despair! On the next page we've got the quickest and simplest of Halloween costumes for angels and devils alike.To learn more about fun and easy Halloween activities, see:

  • Halloween Crafts: Whether hosting a spooky party or looking to keep little goblins entertained, visit this site for easy arts and crafts directions.
  • Halloween Decorations: Bring Halloween holiday spirit to any location when you create these fun and festive decorations.
  • Halloween Masks: For a quick, fun costume and a disguise, follow these tips for creating your own Halloween masks.
  • Halloween Games: There's more to Halloween than eating candy! Get your party guests moving with these ghoulish games.
  • Halloween Recipes: Spooky treats that are good to eat... find out how to concoct delicious delights here.
  • How Halloween Works: Discover the history and traditions behind trick-or-treating and more. Check out this site to learn what Halloween is all about.

Angel and Devil Headbands

Angel or devil? Either way, the headgear is a snap.

Whether the Halloween party starts in 15 minutes or your kid feels a little shy about sporting a full-fledged costume, these easy to make kids' Halloween costumes require little more than a headband and some craft supplies. Or, if you happen to have a force of good or evil inhabiting your house, use these headbands as the starting point for a more elaborate angel or devil costume.

Heavenly Halos
What You'll Need
  • Lightweight silver gift ribbon
  • White, pink, or lavender chenille stem
  • Wire cutters (adult use only)
  • Inexpensive headband
  • 4-inch length of 20-gauge wire
  • Optional: additional ribbons
Instructions
  1. Make a halo by entwining lightweight silver gift ribbon with a white, pink, or lavender chenille stem. Bend the two into a circle.
  2. Use wire cutters to attach the circle to an inexpensive headband by twisting a 4-inch length of 20-gauge wire around the headband and the halo.
  3. Add ribbon streamers, if you'd like, for an even more angelic look.

Prefer a slightly darker look? Try a devil's headband instead...

Devilishly Fun Headbands
What You'll Need
  • Red chenille stems
  • Funnel
  • Cool-temperature glue gun, glue sticks
  • Inexpensive headband
Instructions
  1. Coil red chenille stems around the pointed end of the funnel to make the horns.
  2. Using the cool-temperature glue gun, attach the horns to an inexpensive headband.

Getting hooked on these fast ideas? Continue to the next page for step-by-step instructions to making even your fingernails bewitching this Halloween.

To learn more about fun and easy Halloween activities, see:
  • Halloween Crafts: Whether hosting a spooky party or looking to keep little goblins entertained, visit this site for easy arts and crafts directions.
  • Halloween Decorations: Bring Halloween holiday spirit to any location when you create these fun and festive decorations.
  • Halloween Masks: For a quick, fun costume and a disguise, follow these tips for creating your own Halloween masks.
  • Halloween Games: There's more to Halloween than eating candy! Get your party guests moving with these ghoulish games.
  • Halloween Recipes: Spooky treats that are good to eat... find out how to concoct delicious delights here.
  • How Halloween Works: Discover the history and traditions behind trick-or-treating and more. Check out this site to learn what Halloween is all about.

Bewitching Nails

These spooktacular nails complement any Halloween ensemble -- or make any ensemble perfect for Halloween!

Here's another quick and easy way to add some Halloween spookiness to your look in record time. Bewitching nails are the perfect complement to any costume, and they make the hands handing out candy even that much more appealing!

What You'll Need
  • Polish remover
  • Newspaper
  • Emery board
  • Hand lotion
  • Orange wood stick or cuticle pusher
  • Acrylic paint or nail polish: orange, black, white, yellow
  • Paintbrush with fine, thin point
  • Toothpick

Remove all the old fingernail polish completely. (Be very careful when using polish remover. Always spread a piece of newspaper on your work surface to protect it from any spills.) Using an emery board, shape nails and file away rough edges. Apply a small amount of lotion to each cuticle, and rub it in. Use an orange wood stick or cuticle pusher to push cuticles back. (Never cut cuticles: This can promote infections.) Wash hands well with soap and water. Now let the fun begin!

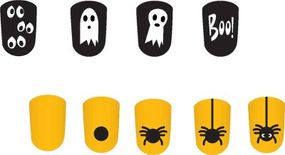
Floating Eyes Instructions
  1. Paint fingernails black. Allow to dry.
  2. Using white paint, paint two pairs of small ovals on each nail. Allow to dry.
  3. Using black paint, paint a small dot on each of the white ovals. For fun, place the dots in a different place on each set of eyes so it appears that these "eyeballs" are looking off in different directions.
Make sure you're not already frightened when you start this project, as you'll need a steady hand!
Spooky Spider Instructions
  1. Paint all fingernails orange. Allow to dry.
  2. Using black paint or nail polish, paint a small circle in the bottom center of each nail.
  3. Using black paint and a toothpick, add the spider's legs by painting 4 short lines on each side of the circle.
  4. Paint a thin black line from the top of the nail to the spider's body. This is the spider's "web." Allow black paint to dry.
  5. Using white paint, paint two small cres­cents on the spider's body for eyes.
Be good! Now mom has eyes at her fingertips, too..
Candy Corn Instructions
  1. Paint fingernails white. Allow to dry.
  2. Using orange paint, paint a thick stripe over the middle one-third of the nail. Allow to dry.
  3. Using yellow paint, paint the bottom one-third of the nail yellow. Allow to dry.
  4. Using black paint, outline a candy-corn-shape triangle in the center of the nail. Make sure the triangle stretches over all 3 colors.
  5. Using black paint, paint over the entire nail except the center triangle.


With this many layers of polish, your nails won't chip for weeks!

By now you should have no excuses left. Pick an idea, gather your supplies, and get those trick-or-treaters ready to go!


To learn more about fun and easy Halloween activities, see:
  • Halloween Crafts: Whether hosting a spooky party or looking to keep little goblins entertained, visit this site for easy arts and crafts directions.
  • Halloween Decorations: Bring Halloween holiday spirit to any location when you create these fun and festive decorations.
  • Halloween Masks: For a quick, fun costume and a disguise, follow these tips for creating your own Halloween masks.
  • Halloween Games: There's more to Halloween than eating candy! Get your party guests moving with these ghoulish games.
  • Halloween Recipes: Spooky treats that are good to eat... find out how to concoct delicious delights here.
  • How Halloween Works: Discover the history and traditions behind trick-or-treating and more. Check out this site to learn what Halloween is all about.
ABOUT THE COSTUME DESIGNERS:

Pretty as a Princess: Paula Bales

Bo Peep and Her Sheep: Diane Hardy

Bag of Bones: Suzonne Sterling

Graveyard Ghost: Suzonne Sterling

Werewolf: Diane Hardy

Cell Phone Costume: Paula Bales

Pencil Costume: Paula Bales

Messy Drawer Costume: Diane Hardy

Clown Costume: Paula Bales

Race Car Driver Costume: Paula Bales

Gypsy Costume: Suzonne Sterling

Elephant Costume: Paula Bales

Owl Costume: Suzonne Sterling

Pig Costume: Paula Bales

Space Alien Costume: Barb Chauncey

Astronaut and Space Dog Costumes: Barb Chauncey

Bewitching Nails: Shari Finger, Susan Tumblety

Advertisement

Loading...